annote
A tool to insert notes within text
(from the
 project)
Revision: 1.30
Christian Queinnec
Université Paris 6 --- Pierre et Marie Curie
LIP6, 4 place Jussieu, 75252 Paris Cedex -- France
This documentation is written in English since it it the language for
Computer Science as much as French is the official language for
fencing, jumping, etc. This allows this documentation as well as the
source programs to be read, debugged and enhanced from amateurs or
afficionados from many countries. Actually these programs are released
under the Gnu Public
License version 2.
The annote tool is part of the VideOC set of tools used to
produce an educational interactive CD to teach the C programming
language. Its primary goal was to decorate code excerpts with popup
explanation messages. The annote tool is a program that swallows a
whole stream of characters, processes it and outputs the resulting
text. Directives appear throughout the text; they allow to insert
notes specified within independent annotation files. The annote
tool thus provides a way to describe texts and/or programs accompanied
by annotations without cluttering their definition.
One of the key principles of the VideOC project was to be able to
derive, from the same set of source files: a book and an interactive
CD. Therefore the annote tool produces an output which is
compatible with:
- TeX, the formating language of choice. An
appropriate LATEX style allows to render these annotations as
sort of minipage footnotes.
See below for the annotations associated to the funny numbers that appear
in the margin.
Some annotations already appeared above. Roll your mouse over the
blue words and observe. See also a TeX-based version to compare with.
- LATEX2HTML
or HEVEA
, it is also
possible to obtain an HTML (mixed with Javascript and/or Java
snippets) version with annotations rendered as pop-up windows
automatically raised when the mouse is over some sensitive
regions;
- pdftex, a PDF version may also be obtained.
Contrarily to the HTML version, the PDF version is not animated.
The annote tool is particularly interesting when commenting
excerpts of programs since nobody wants to pollute program files (and
endanger their readability) nor their apparency on the screen (one can
copy-paste snippets of code as they are seen not as they are
encoded). The source program is rendered exactly as it is written and
annotations are inserted in a non-obtrusive way. Moreover, annotations
and annotated texts are kept inside different files therefore, the
same program may be commented more than once; alternatively some
annotations may apply to more than one program.
The annote tool itself and the other programs of the VideOC
project are available for download
.
 | |  |  |
A minipage footnote is a L AT EX concept for those in the
know [ Lam86, p. 195]. Our annotations look like them but
are rendered with fully redefinable L AT EX macros.
| |  | |  |
| |
1 Examples
Of course, the present documentation makes use of the annote tool
itself and serves as a test file for annote. You may view it in
Postscript
or in
HTML
. Depending on the version
various features are demonstrated.
The Postscript and PDF versions come from TeX. They both contain a
screen snapshot of «La Charte C»
, another document
processed by the annote tool better viewed with an
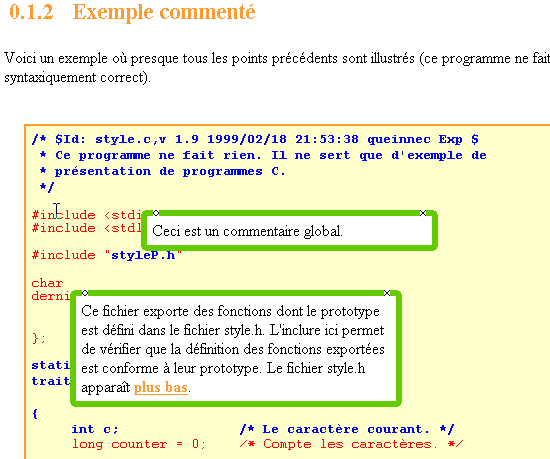
HTML browser. See figure 1 for a snapshot.
Figure 1: A screen snapshot. Annotations are bordered. The annotation above is
temporarily popped-up (the cursor has disappeared but was hovering over
the C commentary) while the annotation below has been nailed down.
Here is another example, a small excerpt of code taken out of the
annote.pl program itself:
The annotations of the previous snippet of code appear below. They look
better when they are raised by an hovering mouse.
2 The current process
The annote tool is, currently, totally written in Perl
[WCS96]. The following phases are performed:
-
Command options are processed.
- The whole text to annotate is read in memory.
- Annotation files are read (they are specified with
\ViCAnnotation{file} and they
usually bear the .ann extension).
\ViCAnnotation are ignored if
embedded within \ViCWithoutNotes and
\ViCWithNotes markers.
- For all notes appearing in annotation files,
\ViCNote{notename} macros are
inserted if missing, except within
\ViCWithoutNotes and
\ViCWithNotes markers.
- Annotations are introduced that is,
\ViCNote macros are turned into
\ViCIndex macros (notes are numbered at the
same time) and the text explaining the note is inserted within
a \ViCPopUp environment right before the
next \ViCPlacePopUpHere marker. The mouse
sensitive context is embedded within
\ViCAnchor and
\ViCEndAnchor macros.
- The final text is output on the standard output stream.
A lot of bells and whistles is of course hidden here and there.
2.1 Command options
When the annote tool is invoked, its command arguments may be
filenames or options. Options start with a dash. A single option is
currently available:
-
-v
- be verbose. You can use it more than once to be even
more verbose.
- -g
- catch a glimpse of the stream to process before
every phase. This option is useful for debugging when eager to
know were are inserted anchors.
- -d
- catch a glimpse of the current state of the stream in case
of fatal errors. This option is useful for debugging. Pay
attention some character codes (from 1 to 20) may appear in
the output.
An unrecognized option triggers the
printing of a small usage notice before exiting. Command arguments
that are not recognized as options are considered to name files. All
these files will be read, in order, into memory before the annotation
process takes place. Missing files are reported.
Typical use is:
cat some files | annote.pl
-v > document.tex
2.2 The big picture
The annote tool is currently named annote.pl and comes
with numerous files that tailor the various phases through which a
text is rendered on a screen. The big picture appears in figure
2.
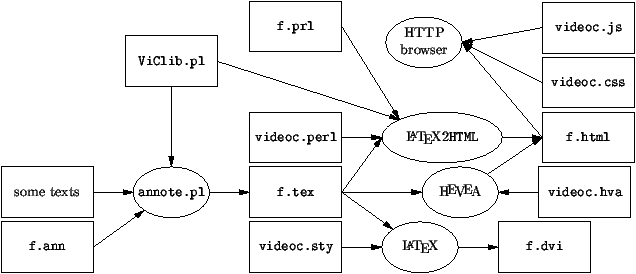
Figure 2: The place of the
annote tool
This is a short introduction to these various files.
-
annote.pl
- is the Perl script known as the annote tool.
- ViClib.pl
- is a Perl library used by annote.pl but
also used by LATEX2HTML. It contains a lot of routines
that may be of interest when using LATEX2HTML.
- videoc.sty
- is the LATEX style file that gives a
meaning to the macros inserted by annote.pl.
- videoc.perl
- is the name of the LATEX2HTML style
file that corresponds to the
videoc.sty style file. It gives to
LATEX2HTML a meaning for the macros inserted by
annote.pl.
- videoc.hva
- is the name of the HEVEA style
file that corresponds to the
videoc.sty style file. It gives to
HEVEA a meaning for the macros inserted by
annote.pl.
- videoc.css
- is the default Cascading Style Sheet
referenced from the result of HEVEA or LATEX2HTML. It
defines however
code must be rendered, how pop-up windows should be displayed,
etc.
- videoc.js
- is the JavaScript library used to animate
pop-up windows. It knows how to handle incompatible browsers
such as Communicator and Explorer but both of them should be
at release 4 or more.
Some files customize the various filters:
-
f.ann
- is the annotation file containing the notes to
be inserted in the text to process.
- f.prl
- is the file that customizes the conversion from
LATEX to HTML. It is written in Perl and uses the resources
of LATEX2HTML as well as these of ViClib.pl.
3 Format of annotation files
Annotations are held in files, usually named with an .ann
extension. An annotation file roughly has an overall LATEX syntax
(mimicing an XML structure) it may thus be edited with a LATEX
mode within your favorite text editor.
An annotation file contains a series of notes and may end with an
explicit \endinput macro. As in TeX, comments
start with a percent sign and finish with the end of the line; unlike
TeX, comments should only be preceded by whitespaces.
A note looks like a LATEX environment with a mandatory argument to
hold the name of the note. Names of notes must be unique through an
annotation file. Within a note may appear a number of fields. Typical
uses of these fields appear in the following syntax:
\begin{note}{name}
\begin{text} a text spanning several lines \end{text}
\width{an absolute or relative width}
\text-style{some style options}
\what-style{some style options}
\what a regexp identifying the mouse sensitive region
...other fields ...
\end{note}
The possible fields of a note are listed in table 1.
| field |
kind |
argument |
default |
| glimpse |
command |
a file name |
|
| text-style |
command |
a CSS directive |
nothing |
| what-style |
command |
a CSS directive |
nothing |
| text |
environment |
a LATEX text |
mandatory |
| what |
command |
a regexp |
mandatory |
| width |
command |
an HTML size |
50% by default |
3.1 Fields of notes
Fields of notes are documented by order of importance. The annotation
file associated to this very documentation is worth reading as an example.
-
text
- This is a mandatory argument. This is the text that will
explain the sensitive region. It appears as a LATEX
environment i.e., it starts with a \begin{text}
and ends with a \end{text} macro. The text may
contain images or hyperlinks.
- what
- This field specifies the sensitive region. Pay attention,
this field is specified as a Perl regular expression (a regexp) and is
written without being enclosed within braces. In the generated HTML
version, when viewed by Communicator 4.x or Explorer 4.y, moving the
mouse over this sensitive region will popup a window displaying the
text of the note. If not specified, the sensitive region is the entire
line where the \ViCNote is.
To ease hooking an annotation at a precise location, the regexp may
also specify part of the context of the sensitive region. In that
case, the sensitive region must be the first parenthetized
sub-regexp. See examples below.
- what-style
- This field specifies the style to apply to the
sensitive region of the annotation. The content of this field appears
within braces as a regular argument of a LATEX macro. The content
is a CSS directive. You may change colors, fonts etc. For instance a
blue background may be specified as \what-style{color:
rgb(0,0,255);}.
- text-style
- This field specifies the style to apply to the
explanation text of the annotation. The content of this field appears
within braces as a regular argument of a LATEX macro. The content
is a CSS directive. You may change colors, fonts etc. For instance a
blue background may be specified as
\text-style{color: rgb(0,0,255);}.
Currently, you should not use this field with Communicator i.e.,
you should not use this field if you want to be portable.
- width
- This command specifies the width of the popup window. By
default, this is half of the current size. Sizes appear within braces
as a regular argument of a LATEX macro. Sizes are specified as in
CSS i.e., they may be relative as in
\width{66\%} or absolute as in
\width{133px} (which means 133 pixels).
- glimpse
- This command may take the name of a file as argument
otherwise it synthetizes a filename based on the name of the current note.
This is a convenient field when debugging annotations since it dumps,
in the specified file, the current state of the processed text right
before handling the current note.
3.2 Examples of notes
The following are exemples of notes taken from the annotation file,
(the annote.ann file since this file is named
annote.bk), associated to this very documentation. The usual
note simply contains a text field and a what field
as follows. Every time the regular expression «CSS» appears in the
text, an annotation will be generated.
\begin{note}{css}
  \what CSS
  \begin{text} CSS stands for Cascading
               Style Sheet. \end{text}
\end{note}
Pay attention to the fact that the what field is a regular
expression so backslashes, parentheses etc. must be handled
cautiously. The following is an example of a more elaborate note
with a background color:
\begin{note}{knuth}
  \what \\TeX{}
  \text-style{color: rgb{0,0,128);}
  \begin{text} \TeX{} is due to Donald Knuth \cite{Knuth84}. \end{text}
\end{note}
When the what field only contains words, pay attention to the
interleaving separators since the words may be split apart by an end
of line. For instance, here is a note that resists to a split between
two words (it also illustrates a comment used in a note):
\begin{note}{a}
  % Pay attention: these two words may be split apart on two lines.
  \what sensitive\s*regions
  \begin{text}
        When the mouse is over that region, a popup window with
  additional information automagically appears. If, without moving the
  mouse and after the window appeared, you click, the window is nailed
  on the screen. A second click in the sensitive area will let it
  vanish. The displayed information may contain hyperlinks, images and
  so forth.
  \end{text}
\end{note}
Observe that notes specified with a what field appear any
time the what regexp occurs in the text to be processed.
To ease positioning an annotation, one may use a slightly more complex
what field to precise the context of the sensitive region as
done in the following note.
\begin{note}{v-option}
  \what annote.pl (-v)
  \begin{text} Repeat this option to increase the verbosity. \end{text}
\end{note}
4 The resulting text
The annote tool swallows all its input stream then processes
it. This section describes the annotation process and the contributing
macros. These macros appear in table 2.
| \ViCAnnotation{filename} |
| \ViCNote{notename} |
| \ViCPlacePopUpHere |
| \ViCWithNotes |
| \ViCWithoutNotes |
|
| \ViCIndex[number,filename,notename] |
| \ViCAnchor[style][number,filename,notename] what \ViCEndAnchor[] |
| \begin{ViCPopUp}{number,filename,notename}{width}{style}
text \end{ViCPopUp} |
Table 2: Macros read/written by the
annote tool
First, all annotation files are read in memory. Annotation files are
specified with the \ViCAnnotation macro. This
document specifies for instance,
\ViCAnnotation{annote.ann}. It is harmless
to cite an annotation file more than once.
An annotation is inserted any time a \ViCNote
macro appears. This macro mentions, as argument, the name of the note
to insert, for instance, «css» in
\ViCNote{css} specifies that the note named
«css» must be inserted.
All the notes of all annotation files are examined and, if there is no
associated \ViCNote explicitly mentioned in the
text, the where field is used to determine all the locations
where to insert the corresponding \ViCNotes. An
error is signalled if a note cannot be placed somewhere in the text.
Every time a \ViCNote{notename} is
found, it is transformed into a
\ViCIndex[number,filename,notename] where
number is the number given to the note (in
the LATEX binding, this number appears in the margin),
filename is the name of the annotation file from where comes
the note and notename is the name of the note. A
ViCPopUp environment will be inserted in the rest of the
text; its argument are the reference of the note (that is, a
number, a filename and the notename), the width
and the CSS style to use in the popup window.
Finally the mouse sensitive context starts with an opening
\ViCAnchor[style][number,filename,notename]
macro and ends with a
\ViCEndAnchor[number,filename,notename]
macro. Observe that arguments of the \ViCIndex,
\ViCAnchor and \ViCEndAnchor
macros are bordered by square brackets instead of curly
brackets. Despite the usage in LATEX, these arguments is mandatory,
not optional as it may seem. This convention had been taken to ease
recognizing the arguments within code contexts.
The annotation is turned into a ViCPopUp environment. This
environment will appear, after the \ViCNote that
calls for it, right before the next
\ViCPlacePopUpHere macro. A ViCPopUp
environment contains everything that is necessary to generate a
minipage note or a pop-up window later on.
When splitting a document into numerous independent HTML pages, pay
attention to place at least one \ViCPlacePopUpHere
per generated page. Since LATEX2HTML tends to process pages within
independent Unix processes, it may also be necessary to let
\ViCAnnotation macros be present in these pages
either.
4.1 Examples
Consider, for instance, the paragraph
you are reading. I make it long enough
so that two notes
can simultaneously apply on it: one of them being explicitly called. Here is
how I originally wrote it:
Consider, for instance, the paragraph \ViCNote{this-paragraph}
you are reading. I make it long enough
so that two notes
can simultaneously apply on it: one of them being explicitly called. Here is
how I originally wrote it: \par
%%% QNC: Place the text of previous annotations here:
\ViCPlacePopUpHere%%%%%%%%%%%%%%%%%%%%%%%%%%%%%%%%%%%
The result of the annote tool looks like:
\ViCAnchor[][29,annote.ann,this-paragraph]Consider, for instance, the paragraph
you are reading\ViCEndAnchor[29,annote.ann,this-paragraph]. I make it long enough \ViCIndex[29,annote.ann,this-paragraph]
so that \ViCAnchor[][30,annote.ann,two-notes]two notes\ViCEndAnchor[30,annote.ann,two-notes]\ViCIndex[30,annote.ann,two-notes]
can simultaneously apply on it: one of them being explicitly called. Here is
how I originally wrote it: \par
%%% QNC: Place the text of previous annotations here:
\begin{ViCPopUp}{29,annote.ann,this-paragraph}{50\%}{}
 Yes, this paragraph!
\end{ViCPopUp}
\begin{ViCPopUp}{30,annote.ann,two-notes}{50\%}{}
 The two notes are named «this-paragraph» and
  «two-notes».
\end{ViCPopUp}
\ViCPlacePopUpHere%%%%%%%%%%%%%%%%%%%%%%%%%%%%%%%%%%%
In this excerpt you may see the introduction of the
\ViCNote{two-notes} triggered by its «what»
field containing the words so that two notes. The two
\ViCNotes are then transformed into
\ViCIndex accompanied
by ViCPopUp environments and \ViCAnchor
and \ViCEndAnchor characterization of mouse
sensitive regions.
5 Bindings
This section describes how to process the result of the annote
tool.
5.1 Binding with TeX or pdftex
This is quite simple, just process the resulting stream with LATEX.
Of course, the videoc.sty package should be used to give a
meaning to the inserted macros (see table 2). It
is quite simple to redefine these macros provided some simple
TeX-knowledge.
5.2 Binding with HEVEA
This binding is quite simple. Just include the videoc.hva
style file when processing the TeX file.
HEVEA is tremendously faster than LATEX2HTML.
5.3 Binding with LATEX2HTML
This is more complex since it has to drive the LATEX2HTML engine.
As shown on figure 2, I write a
.prl file to customize this documentation with respect to
LATEX2HTML.
Here follow some hints on how LATEX2HTML work:
-
customization and styles are loaded,
- the entire text is read and pre-pre-processed,
- verbatim-like parts are removed from the text and hidden
somewhere,
- environments are translated into html (the text is therefore a
mixture of TeX and HTML),
- commands are processed,
- verbatim-like parts are inserted back into the text embedded
within <PRE> and </PRE> tags,
- the entire text is post-post-processed and output.
A lot of LATEX style files are already defined by LATEX2HTML.
These files contain Perl functions definitions specifying how they are
translated into HTML. A LATEX environment e is defined by a
do_env_e function (this function receives as single
argument the content of the environment) that returns the translated
environment. A LATEX command c is defined by a
do_cmd_c function (this function receives as single
argument the rest of the text) that returns the rest of the text (part
of which is not yet parsed). There exists some macros to retrieve
arguments (optional or mandatory) (see examples in hte
annote.prl file).
To process the result of the annote tool, it is necessary to
pre-pre-process the text (there is a function of the
ViClib.pl library that allows to add new pre-pre- or
post-post- processing functions) and leave enough information for the
following passes. Some treatments have to be done again on those parts
of the text that were hidden in verbatim-like sections.
6 Caveats
It is not recommended that a similar anchor occurs twice in a source
line. For instance if you want to annote every occurrence of a word
such as ``the'', chances are that two ``the'' occurs on the same line
and this leads to a problem of generation. Just break your source line
to avoid this problem. This problem might be corrected in some future.
Another restriction inherited from HTML is that it is not possible
to embed an anchor within an anchor. Therefore, it is not possible to
specify a mouse sensitive region including an anchor.
7 Problems
This section should not exist! Unfortunately, there are at least the
following problems that are summed up here so I cannot forget about
them.
-
The text-style field works but resets Communicator for all
following annotations to a transparent background color which
I was not able to change.
8 Conclusions
The best way to use the annote tool is probably to experiment with
it once this document is read. The annote.bk file and its
companion annote.ann annotation file are self-describing
examples. These files are part of the
distribution of the annote
tool. Of course, to browse the HTML version will also help to see the
result.
Happy annotations!
References
- [Knu84]
-
Donald Ervin Knuth.
The TeX Book.
Addison Wesley, 1984.
- [Lam86]
-
Leslie Lamport.
A Document Preparation System, LATEX User's Guide &
Reference Manual.
Addison Wesley, 1986.
- [WCS96]
-
Larry Wall, Tom Christiansen, and Randal L Schwartz.
Programming perl.
O'Reilly & Associates, Inc., second edition, 1996.
This document was translated from LATEX by
HEVEA.