The VideOC styles
for dvi, pdf, HEVEA, LATEX2HTML
(from the
 project)
Revision: 1.36
Christian Queinnec
Université Paris 6 --- Pierre et Marie Curie
LIP6, 4 place Jussieu, 75252 Paris Cedex -- France
This documentation is written in English since it it the language for
Computer Science as much as French is the official language for
fencing, jumping, etc. This allows this documentation as well as the
source programs to be read, debugged and enhanced from amateurs or
afficionados from many countries. Actually these programs are released
under the Gnu Public
License version 2.
The overall goal of the VideOC project was to build and experiment
tools in order to produce an educational CDrom to teach the C
programming language. This long term goal requires several
intermediate goals to be fulfilled. One of the main constraint of that
project was to be able to derive from the same set of description
files:
-
the entire hierarchy of files/data/programs needed to populate the CDrom,
- the data needed for the runtime of the CDrom (which uses its own
document server, QCM manager etc.),
- a book of selected exercises in C,
- some printed material for students in various formats i.e.,
Postscript, PDF, dvi, html.
Moreover, care has been paid to unify the sources to be more or less
independent of the final formats. The styles that are described in
this document try to achieve that goal.
As far as I know there are no tools on the market that satisfies all
these goals. There are good software products for various tasks but
they often use opaque proprietary formats that preclude to use the
information entered in these tools in a way not foreseen by the
tools. The availability of all these data (text of lectures, exercises
and their solutions, programs, etc.) in comprehensible formats makes
possible for any teacher in the world to complement, change or
experiment with this ``package''.
The documents of the VideOC project are most often written in a
limited subset of LATEX and may probably be translated into XML fairly
easily. The rules of style for these documents are explained in the
present document which, in turn, observes these rules and serves as a
test file for these styles. This document may be read in
Postscript,
HTML.
The source of this very document contains a lot of examples of use of
the styles and serves as an additional documentation.
The programs of the VideOC
project are available for download
.
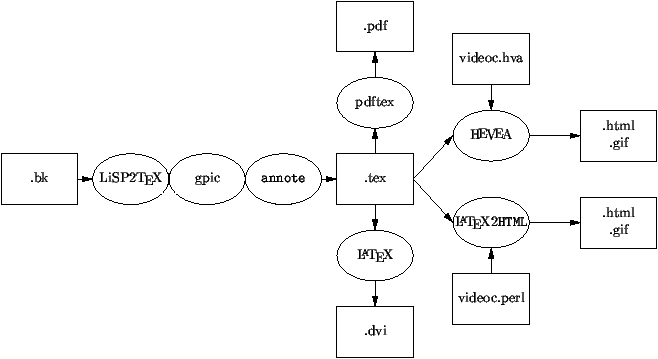
There are many files that are involved with these multiple
targets. Here is the big picture:
1 Drawings
Figures are worth thousands words ... when appropriate. Any
figure must be able to show on dvi, pdf and HTML
documents. The current version of pdflatex only accepts
PNG files. In HTML, three formats only are possible:
GIF (a non-free format not recommended by GNU), PNG
(not every browser recognizes it) or JPEG (not appropriate
for schemas with lines, arrows and texts). I decided to mainly use
GIF images. GIF images also have the advantage that they may be
animated.
There are several ways to create a figure:
-
Use xfig to draw it by mouse.
This figure may then be exported in Postscript, or
gpic, or GIF or, PNG. This is
useful for a single drawing. While xfig is useful for
a single drawing, a programmatic way may often be
preferable for a sequence of drawings with only a few
intervening modifications.
- Program directly the figure with gpic. This is not
intuitive but is worth the initial step when reusable macros
are used for a series of drawings.
These figures generate \special commands that pose
problems to pdflatex.
- Include an existing (independently obtained) figure in
Postscript or GIF or, better, in PNG.
The graphicx package takes care of that provided the
appropriate converters are specified.
The following commands unify the insertion of images independently of
the final format (ps, pdf, html).
1.1 The GPICimage environment
A GPIC program should be enclosed within
\begin{GPICimage} and \end{GPICimage}. The
resulting image does not form a paragraph nor it is centered on its
line. You have to specify this explicitly as for the following example:
It is possible to concatenate several images horizontally if
separating them with the \subImage command. This command takes as
argument the width of the preceding image expressed as an integer
percentage of the current line width (i.e., from 0 to 100). The
following figures respectively have a 50%, 33% and 14% width (the
total which is less than 100% ensures the three figures to be on the
same horizontal). To use percentages makes easier to obtain a similar
effect in HTML.
The \subImage command may even be used before an image is
produced, it simply considers the preceding image to be blank but sets
its width according to its argument. It is therefore simple to add
intermediate space before, between or after images. The following
figure looks like the preceding one except that widths now are 20%,
40%, 20% and 20%.
The last figure was obtained by the following code:
\begin{center}
\begin{GPICimage}
\subImage{20}
.PS
ellipse "GPIC" "image"
.PE
\subImage{40}
.PS
ellipse "another" "GPIC" "image"
.PE
\subImage{20}
\subImage{20}
\end{GPICimage}
\end{center}
Caveats
When the \subImage command is used for multiple images, the
last image must be followed by such a command so its width is known.
1.2 The URLimage command
The URLimage command specifies an image file to be included.
This command does not create a new paragraph nor it centers the
produced image. The first argument is the name of the file without
extension. The extension will be added by the various processors:
-
LATEX will fetch a file with a ps or eps
extension,
- pdflatex will look for a file with a png
extension,
- HEVEA or LATEX2HTML will look for a gif extension.
Unfortunately, all these processors may take incompatible options
that's why the URLimage command is followed by the Postscript
options, the PNG options and, the GIF options. The
Postscript options are those specified by the
includegraphics command of the graphicx package
(they are separated by commas). The GIF options are those specified
by HTML (they are separated by whitespaces).
For instance, to include the
logo inline, just say:
For instance, to include the
\URLimage{videoc}{scale=0.25}{}{height=63 alt=VideoC},
logo inline, just say:
Caveats
Observe the relative pathname used to cite the image file and pay
attention to these pathnames since within your HOME directory or on
the HTTP server, these may not be the same!
2 URL
An hypertext document is full of links that may be followed. The
LATEX version, on paper, does not support these links which must be
rendered differently but the pdf and HTML output support them
so you can click on them and be teleported. Two commands may be used
that hide the various expansions depending on the final format and the
next processor: HEVEA, LATEX2HTML or pdflatex.
2.1 The referenceURL command
The referenceURL command takes two arguments. The first one
is the text that serves as an anchor to the hyperlink, the second one
is the URL. The URL may not contain funny characters such as
tilde. The URL is rendered as an hyperlink except in LATEX where it
is rendered as a footnote. This command is fragile, you may expect
problems when used in title or section commands.
Here are some examples of URLs: This appears in the document as:
Here are some examples of URLs: \begin{itemize}
\item \referenceURL{\videoc{} project page
}{http://videoc.lip6.fr/cederoms/VideoC/index.html}.
2.2 The singleURL command
The singleURL command takes an URL as argument. This command
may be used to cite explicitly an URL, for instance a mailto
URL. It appears in full letters as a clickable link except in TeX.
The singleURL command shares the same customisation
possibilities offered by referenceURL.
In any case, mail kudos to
mailto:Christian.Queinnec@lip6.fr is written as:
In any case, mail kudos to
\singleURL{mailto:Christian.Queinnec@lip6.fr} is written as:
2.3 The defineURL command
Sometimes it is necessary to derive an URL from another base URL. This
makes easier to change the base URL and to let all the others be
relative to it. This must be explicited since it has to be handled
specially (mainly because # is a special character for
LATEX and for URLs). The defineURL command also permits
URLs to contain funny characters such as tilde.
The defineURL command takes two arguments. The first is a
LATEX name (beginning with a backslash), the second is a base
URL. The first argument will be defined as a zero-ary command that
will expand into the base URL. This command is robust.
Examples are in order. For instance, just write the following to
define the \QueinnecURL command:
\defineURL\QueinnecURL{http://www-spi.lip6.fr/~queinnec}
You may now use the \QueinnecURL command in last argument of
\referenceURL or \singleURL. Here is a link towards my
home page
which is written as:
Here is a link towards my
\referenceURL{home page}{\QueinnecURL/WWW/Queinnec.html}
which is written as:
Caveats
The problem with the two first commands is that they are not robust
(this is LATEX jargon that means that you cannot use these commands
within other macros, titles for instance). Sometimes you need to find
a way to insert an URL in such a context and defineURL may
help. I did not succeed to find a portable way to insert a mailto URL
in the title so the only possible way seems to clutter source files
with conditional code.
3 Citing code snippets
Rendering code snippets depends on the language of the snippet. Code
excerpts may also be rendered in line or as paragraphs. Two commands
exist for these goals. These commands are revised, improved but
compatible versions of the lisp command of the ApocaLIXP
package that comes with
LiSP2TeX. This tool
allows to extract code excerpts from files and to cite them surrounded
by appropriate commands. Use the videoc.l2t style file to
customize LiSP2TeX.
3.1 The snippet command
Codes excerpts start with the \snippet command and
end with \endsnippet. The
\snippet command takes an optional argument
(embedded within square brackets) that specifies the default
language. Among these languages are c and scheme.
The language is used to provide a default customization.
Within the excerpt, all characters (including newlines) are copied
verbatim. There is however a single exception: commands starting with
a backslash are recognized and processed but these commands cannot
have arguments. Apart the \endsnippet nullary
command that ends the \snippet quasi-environment,
there is also the \[ ...\] sequence that typesets its inner text in LATEX.
Observe that these commands do not form pure LATEX environment so
you cannot write \begin{snippet} ...\end{snippet}. This is due to TeX and
its catcode behavior. It is simpler to recognize the end with
a regular command than something containing curly braces. However it
is simple to transform one into the other if needed (see the
ViClib.pl library for instance).
As a matter of style, it is better to start the code to be copied
verbatim on the line that follows the snippet command. This
is to avoid a first line which is not aligned with the following
ones.
Here are some examples. The first one is from Scheme:
;;;
(define (fact n)
(if (> n 1)
;;
(* n (fact (- n 1)))
1 ) )
(define (test)
;;
`',(#t #f #\a "foo" 3.14) )
This one is a test for me:
(define test "test") ;
The second is from C:
int
fact (int n)
{
if ( n > 1 ) {
/* in TeX: n! = n × n-1! */
return n * fact(n-1);
} else {
int result = 42/42; return result;
}
}
void
test ()
{
printf("\n\t Test%s", '\0'); \
return;
}
Here follows the original LATEX code for the two previous examples:
Here are some examples. The first one is from Scheme:
\LispCite{define}{fact}
\LispCite{define}{test}
\snippet[scheme];;; $Id: snip.scm,v 1.1 1999/01/19 20:42:57 queinnec Exp $
(define (fact n)
  (if (> n 1)
      ;; in \TeX: \fbox{$n! = n \times {n-1}!$}
      (* n (fact (- n 1)))
      1 ) )
(define (test)
  ;; A bunch of values with various types:
  `',(#t #f #\a "foo" 3.14) )\endsnippet
This one is a test for me: \snippet[scheme]
(define test "test") ; comment ended by an endsnippet.\endsnippet
The second is from C:
\snippet[c]
int
fact (int n)
{
     if ( n > 1 ) {
          /* in \TeX: \[$n! = n \times {n-1}!$\] */
          return n * fact(n-1);
     } else {
          int result = 42/42; return result;
     }
}
void
test ()
{
     printf("\n\t Test%s", '\0'); \
       return;
}\endsnippet
In fact, I lied in the previous paragraph since the excerpts are
automatically extracted from Scheme and C files with the
LiSP2TeX tool.
Therefore I really wrote:
Here are some examples. The first one is from Scheme:
\FromFile("snip.scm" fact test)
The second is from C:
\FromCFile("snip.c" "fact" "test")
The default style (which is, by default, the current value of the
snippetDefaultLanguage command i.e., the
scheme style) is obtained
when one does not mention any language; in this case you even don't need to
use the square brackets since there is nothing in it. You thus may
write directly:
This a
is snippet
This another
is snippet
This a third
is snippet
The source code for the previous example shows the various possible
wordings. It is however encouraged that you always use an explicit
language to qualify the snippet because this language will be used to
give a class for the DIV section in the generated HTML. Here is the
source code:
\snippet
This    \[a\]
     is   snippet \endsnippet \snippet[]
This    \[another\]
     is   snippet \endsnippet \snippet[scheme]
This    \[a third\]
     is   snippet \endsnippet
Of course it is possible to define one's own style: see below.
Even if it is possible not to mention the language, it is far better
to always specify it to obtain a better rendering into HTML. This is
because the language is used to give a CLASS tag to the DIV that
encloses a snippet. You may then associate to this CLASS some
rendering properties via a Cascading Style Sheet file.
Customization
There is a number of ways to customize the rendering of snippets.
Customization is expressed by hooks. There are general hooks and
language-dependent hooks. These later hooks are run after the general
ones so they may correct the default behavior for the hook. Therefore
there are two different levels of customization depending on whether
you want to customize the snippet engine or a particular language
rendering.
-
snippetBeforeHook
- is run when entering the snippet engine
just after the \snippet command (and its
optional argument) but before any character is read. By
default, it starts a new paragraph.
- snippetAfterHook
- is run when exiting the snippet engine just
before the \endsnippet command. By
default, it closes the current paragraph.
- snippetBeforeLineHook
- is run at the beginning of every line. It
may be redefined to print the number of the line for
instance. By default, it does nothing.
- snippetAfterLineHook
- is run at the end of every line. By
default it does nothing.
- snippetBeforeTeXHook
- is run before any TeX inclusion opened
by the \[ command. By
default it changes the font to italics.
- snippetAfterTeXHook
- is run after any TeX inclusion closed by
the \] command. By
default, it closes the math mode if not yet done.
- snippetVerbatimHook
- is an internal hook which is run any time
the catcode of characters are changed so it is possible to
make some characters active. The Scheme environment for
instance redefines the semicolon to render comments in
italics.
For all these hooks, there may exist a language dependent hook whose
name is formed after the name of the hook suffixed by the name of the
language (the optional argument of the \snippet
command which is recorded in the \snippetLanguage
command which, by default, is equal to the current value of the
snippetDefaultLanguage) command.
Moreover, styles may be inherited. The exact behavior of the hook
mechanism is as follows. Suppose the optional language of the snippet
be abc and the hook hook then, hook is run (if
defined) then hooka, hookab and
hookabc. Therefore if you mention schemeplus as the
language of a snippet, you will run the general hooks, the
scheme hooks and the schemeplus hooks (and all sort
of intermediate hooks such as sch or schemeplus if
they are defined).
It is often the case that within these hooks you only toggle some
predefined customization habits. Here there are:
-
snippetEnableTex
- defines the macros delimiting an insertion of
plain TeX within a snippet. It is custom to use
\[ and \] to enter
and exit the inclusion.
- enableLispComment
- renders Lisp comments in TeX.
- disableLispComment
- renders Lisp comments verbatim.
- keepLeadingSpaces
- (a condition) keeps leading spaces right.
after the semi-colons beginning a Lisp comment.
- enableBackSlashDoubleQuote
- makes
\" appear as \".
- enableSchemeCharacters
- makes
#\c appears as #\c.
- disableSchemeCharacters
- makes active a macro after a hash sign.
- enableSharpInComment
- makes # to be a regular character within
comments. This makes easy to talk of true and false!
- enableSomeBackslashedChars
- (in C) makes
\n and siblings
appear as they stand.
- showBackslashNewline
- (in C) makes a backslash followed by a
newline appears as a backslash alone at the end of a line.
- doubleBackslashToLetOneAppear
- (in Perl) makes
\\ stands
as it is.
Here is some examples of these various possible customization.
(define (foo)
;;
;; four spaces
'bar )
3.2 The snip command
The \snip command permits the insertion
of code within lines. It is somewhat similar to the
\verb command except that it shares a number of
features of the \snippet command.
A typical use of the \snip command is the
following: \snip[file]{file.html} where the word
file.html will be typeset according to the convention of the
file style. By default, if the optional language parameter is
absent, it defaults to the value of the
snippetDefaultLanguage command. Therefore to write
\snip[\snippetDefaultLanguage]{file.html} is equivalent to
write more simply \snip{file.html}.
The following hooks are defined for the \snip
command:
-
snipBeforeHook
- which is run right before,
- snipAfterHook
- which is run right after.
4 Boxing
The \parbox command in LATEX takes as arguments a width
followed by a text that must be typeset in a box of that width. The
width is often expressed with absolute units (centimeters, Didot
points, etc.). A variant of this command is \subBOX that takes
a width expressed in percentage of the current line width. This
command may only be used within the BOXES environment.
|
For instance, this text is typeset in a box that is twice as narrow as
the non-empty box that follows. |
|
This other box is twice as large as the one to its left. These two
boxes should appear on a same line, moreover they are separated by a
small empty box. The percentages used here are, from left to right:
30%, 5% and 60%. Once again, the total sum should be a little less
than 100% to avoid breaking the horizontal layout. |
The previous example is written as:
\begin{BOXES}
\subBOX{30}{
For instance, this text is typeset in a box that is twice as narrow as
the non-empty box that follows.}
\subBOX{5}{}
\subBOX{60}{
This other box is twice as large as the one to its left. These two
boxes should appear on a same line, moreover they are separated by a
small empty box. The percentages used here are, from left to right:
30%, 5% and 60%. Once again, the total sum should be a little less
than 100% to avoid breaking the horizontal layout. }
\end{BOXES}
5 Texts
All texts, exercises, solutions are written in a extended subset of
LATEX: a subset since not all LATEX can be easily turned into
html, however this subset is extended by the macros defined in this
document. This subset has been chosen to be easily converted into XML
some time. Remember that there are a number of ways to combine
information to prepare books, lecture, slides, web pages. Therefore,
at the lowest level only exist topics and exercises.
5.1 Topic
A topic is a small amount of text on a precise subject. Topics are
usually kept in .bk files (I now tend to use .bk for
a complete document and .hbk for a file that only contains
topics or exercices. These .hbk files need to be included in
some other complete documents). A topic appears as a LATEX
environment with two mandatory arguments: a label to uniquely identify
the topic and title for this topic. The label should only use regular
ASCII alphanumeric characters.
\begin{topic}{key}{title} ... \end{topic}
A topic may contain many parts but primarily a text part that explains
the title (this is the body of the topic). This text part contains a
LATEX text and appears as a text environment. There must
be exactly one text section but it may contain more than one
paragraph.
A topic may also contain the mention of some credits (author(s),
author(s)'(s) email) as well as some information on the current
version of the topic. All these fields are free text for now.
\authorEmail{the author(s)'s email}
\careTakerEmail{the email of the maintainer of the topic}
\keywords{a comma-separated list of keywords}
\begin{credits} ... \end{credits}
A topic may also contain some pre-requisites that should be read
before the current topic. The argument of \required is a
sequence of references (more on references below).
\required{references}
Symmetrically a topic may lead to various suggested topics. These are
expressed with the following macro.
\suggested{references}
It is also possible to structure the text section with levels
of details. The detail environment isolates a piece of text
that should be displayed (interactively) only when the user has enough
experience. A level of detail may be programmed to appear
automatically after some delay. Levels of details may be embedded at
will. Similar to a topic, a detail is introduced with a label and a
title (therefore it may be possible to let details appear based on the
set of labels qualifying details).
It is mandatory to obtain a correct TeX rendering that the
text section be the last section that is, all
credits, suggested and
required macros appear before it.
Here is a complete example:
\begin{topic}{palmature-canard}{La palmature des canards}
\authorEmail{Christian.Queinnec@lip6.fr}
\careTakerEmail{ei@total.foo.org}
\required{\referPlace{Les palmipèdes}{cours-palmipede}
\referPlace{Les ortolans}}{cours-ortolan}
\suggested{\referPlace{Les mammifères}{dictionnaire-mammifere}}
\credits{Enrique Instanchi \singleURL{mailto:ei@total.foo.org}
$Revision: 1.36 $ }
\keywords{canard, bon dieu, enfant}
\begin{text} Pas grand-chose à en dire!
\begin{detail}{petit-rien} et rien de plus!! \end{detail}
\end{text}
\end{topic}
5.2 Exercises
An exercise has a structure that looks like a topic. It appears as a
LATEX environment with a label and a title. It has a \required
component, a \credits part, a text part that presents
the exercise followed by one (or more) answer environment(s)
containing the answer(s). The text part may use details as
well. This is particularly convenient to give some hints to the
student.
Here is an example:
\begin{exercise}{cent-sous}{Question à cent sous}
\authorEmail{Christian.Queinnec@lip6.fr}
\careTakerEmail{ei@total.foo.org}
\required{\referPlace{La palmature des canards}{cours-canard}}
\suggested{\referPlace{Les mammifères}{dictionnaire-mammifere}
\referPlace{Le problème du jour}{exercice89}}
\credits{Enrique Instanchi \singleURL{mailto:ei@total.foo.org}
$Revision: 1.36 $ }
\keywords{question, cent sous}
\begin{text} Citez un enfant du bon dieu?
\begin{detail}{Indice} Pensez à «~sauvage~». \end{detail}
\begin{answer} «~canard sauvage~» est la bonne réponse. \end{answer}
\begin{answer} mais on peut aussi pensez au
rousseau-iste «~bon sauvage~». \end{answer}
\end{text}
\end{exercise}
There may exist additional fields to specify the testing
Makefile, the directory where tests should be run, etc.
When typeset, the solution may appear or not depending on the value of
the \ifWithSolution LATEX conditional macro. If this macro
is not set, it defaults to true.
An exercise is not restricted to a single question. If more than one
question is present then use the question environment as in:
\begin{exercise}{cent-sous}{Question à cent sous}
...
\begin{text}
Cet exercice porte sur l'argent.
\begin{question} Combien de sous dans un euro ?
\begin{answer} un certain nombre. \end{answer}
\end{question}
\begin{question} Combien d'euros dans un sou ?
\begin{answer} Ca dépend. \end{answer}
\begin{answer} L'inverse de la réponse précédente. \end{answer}
\end{question}
\end{text}
\end{exercise}
5.3 Lower structures
The text of both topics and exercices may be further structured into
subtopic or subsubtopic environments.
5.4 Higher structures
Above topics and exercises, the structure is free. You may combine them
to form a lesson (a kind of LATEX chapter except that a lesson
forms a LATEX environment with a title as mandatory argument).
\begin{lesson}{title} ... \end{lesson}
Then you may combine lessons to form a book.
5.5 References
When a topic or exercice is defined, it may be referred to with a
\ref LATEX macro using the label of the topic or exercice.
For an hypertext, another possibility is to refer to a topic or
exercise with a \referPlace macro that will be typeset as a
clickable link à la \referenceURL.
When expressing \required or \suggested links, there is
a need to mark topics or exercises in order to refer to them. These
are the analog of \label and \ref except that topics and
exercices are automatically marked so you only need to refer to them.
This may be done with \referPlace.
\referPlace{title}{label}
It is currently not possible though it may be useful to mark a precise
place within a topic or an exercise except using the \label and
\ref mechanism.
6 Miscellaneous
The \ttbackslash macro outputs a backslash and its argument in
typewriter font.
7 Putting all these styles at work
First, use LATEX2e, then use the videoc package that is,
include the following line right after the \documentclass
line: \usepackage{videoc}.
To generate HTML pages, use HEVEA and the videoc.hva
package.
8 Problems
This section should not exist! Unfortunately, there are at least the
following problems that are summed up here so I cannot forget about
them.
-
The CSS stylesheet specifies a purple border around snippets
which is only displayed by Netscape if scrolling slowly.
This document was translated from LATEX by
HEVEA.